

2 - DIY Mic “EMR 5024”
This project is finished.
Scroll to 2024 05 12 update for the TUTORIAL
(Though you’ll miss a lot of cool stuff)
Sound samples using these mics

And many more for download (96kHz 32Bit, CC0 license) in the Field Recording Blog Post
INTRODUCTION
This post is to document my journey of making my own mics for field recording and some more delicate studio work. They’re omni mics, should provide a very “natural” sound and are seriously sensitive (60mV/Pa compared to an NT1’s 35-40mV/Pa - see graph). This means that you need minimal preamp gain and will hypothetically have an as clean a signal as possible. Louder sounds will of course overload the microphone because of this, but these are definitely not made for high SPL applications.
Also, I’m learning Blender, so here’s something fun:
mV/Pa (sensitivity) by microphone
Additional challenge
The plan from the get-go was to make something that could fit into the chuck of a Neutrik connector for travel-ability, which means sourcing the smallest components possible…
2024 04 25 - Video 1 - Proof of concept
Still working out the kinks, but I'm one proof of concept down.
2024 04 28 - Video 2 - First field test
Made a second unit; Quick field test.
Encountered some mistakes in the prototypes.
2024 04 30 - Video 3 - Studio Test
Quick demo of my C214 matched pair vs my new trusty little bois. Still need to give them a name, and I’m open to suggestions.
Missing info in Circuit diagram
As I get into in the video, I was disappointed to find missing details in the manufacturer's suggested wiring:
but I think I've corrected this with what little I know of circuitry. See my new circuit diagram (made with free CircuitLab.com).
While I calculated a 43pF Capacitor on the negative out, I could only source a 47pF. I'll be very interested to see the difference in sound as I accidentally ordered 4.7pF, installed it, tested it with great success... so, will it improve the signal to noise ratio? Sensitivity? I'm really looking forward to seeing what happens.
Next up for this DIY mic project
It's pretty tough fitting it all into a Neutrik NC3MXX-B connector and am working on a tutorial on making the mic:
And possibly... make more and send to friends for review because I think it's a really great-sounding item. 😁
AND HOW AWESOME IS THIS TINY, PORTALE SET-UP!?!? I'm beyond excited to be using it.
Finally, hear the first batch of the recordings in the Blog Field Recording post. I'm super happy with how these mics turned out, still can't believe I made them.
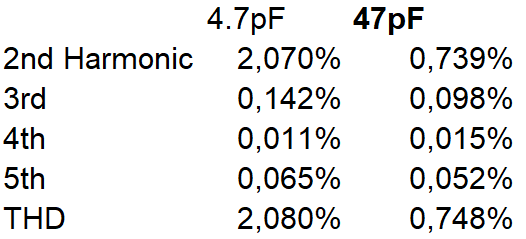
2024 05 02 - New Caps arrived!! (4.7pF vs 47pF capacitors)
The Frequency response alone doesn’t tell much; The change is basically unperceivable when only looking at this. HOWEVER, the Harmonic structure has substantially changed (for the better if we’re striving for a cleaner signal) and all from changing just one €0.09 component.
THD improved 36%.
Measurements were taken four times (in case accidental noise messed with it), averaged and the line was var smoothed for intelligibility. That substantial 2kHz dip is likely some weak points in the speakers and capsule that compound - as long as it does not become variable across tests, it won’t impact precision of measurements.
Finally, HERE is a great article on why capacitors are so important in audio.
2024 05 04 - Finalized part choices and assembly
These are two new ones with the thicker and full copper wires, corrected capacitors - Aaaaaand, a 3D printed case is in progress!
This first finalized unit is going to a friend to get his professional opinion!
And yes, that’s Mythbusters on the ipad haha

2024 05 08 - Compact Rig and FINAL PARTS LIST
Sidenote: You can get a really compact handheld stereo rig with a camera rig -style cheese plate. (I happen to use this one)
Parts List (for one mic)
AOM-5024L-HD-R electret capsule
Neutrik NC3MXX-B (optional Neutrik color ring, or 3d print your own)
KERKO-500 47P 47pF Ceramic Capacitor
(for simplicity, because ceramic caps are non-polar / not directional)2,2 kOhm resistor (also non-polar / not directional)
Wire - I happen to use 0.14mm² copper: this one for ground and this one for everything else
(it’s a simple circuit, so two colors are just nice identifiers. The prototypes used 0.05mm² wire and that worked really well, the copper is just a luxury for assembly and potentially longer life)Rode WS9 windshield 1x per microphone
Alternatively, HERE IS A SHOPPING LIST - I happen to use the German Reichelt.de (for no particular reason)
2024 05 12 - Tutorial
Tutorial - Video
There’s a video version - Below is the blog friendly one!!
There’s also a Youtube playlist of all the videos I made so far for this project.
Tutorial - Blog-friendly
1. Cut all the wires to size
1x approx 2cm wire for the ground of the 3-pin connecting to the housing ground tab
2x approx 7cm wires: one for positive, one for ground
(image is for two mics)
2. Connect Pin 1 to the housing’s ground tab
3. Resistor in Pin 2 and Capacitor in Pin 3, then solder together their ends
4. Connect the 7cm ground wire
5. Connect the 7cm positive wire
6. Secure the circuit into the chuck
See the video on how to fit it snugly
7. Cut off the bushing’s end
This is where the microphone capsule will go, which happens to be the exact same diameter (9mm) as this opening.
8. Complete connector assembly
9. Pre-solder the ground/positive wires
10. And solder them to the mic capsule
BEWARE to not exceed 360 Celsius, and only solder for few seconds at a time.
See that I’m soldering on a GPU heatsink to dissipate what heat I can from the microphone capsule.
11. Carefully press fit into the bushing and DONE
EXTREMELY important for field recording
A good wind shield. My Rode WS9 windshield happens to lock perfectly behind the Neutrik color ring, so I’ll recommend this unit.
2024 06 01 - Update
Thanks to Andrew who messaged in with two points I want to elaborate on:
While most electret microphones do not need phantom power, this electret capsule in this circuit does need phantom power; I failed to mention that before.
Since finishing my Component Rating Testers yesterday, I’ll see if I can first off fine tune the High/Low pass filtering using these testers, but also see if the need for phantom power can be altered.
Until then, I hope you’re all having fun with these mics. 😁